Sunday, December 23, 2012

2012 Calendar Challenge - Collection of Twelve


Sorry for the quality of this but used the snipping tool to convert a word document into a png file so that I could upload it here.  This is my collection of easel calendars that I made for my family and friends, inspired by The Craft Barn Challenge here

Wishing all fellow crafters a very merry Christmas and a happy and healthy new year.

2012 Calendar Challenge - Embossing


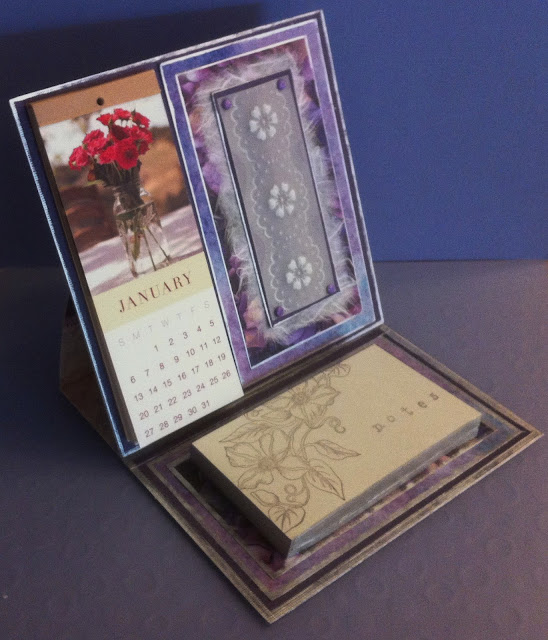
For the final challenge over at The Craft Barn click here the technique is embossing.  Having sent out all my calendars I only had one left for me to make for myself so I chose to use heat embossing using Suze Weinberg's Cloisonne with Utee method, a favourite technique of mine.  This always give such a lustrous effect and is great for tags, centerpieces for a card, jewelry etc.  Firstly I swiped the cardstock with Versamark ink and sprinkled black Utee all over and melted it with my heat gun.  Two more layers gave a heavy coat thick enough for embossing well.  I dusted the black when cool with mica powders of various colour and reheated to melt them in.  While this was still hot I stamped the swirls with silver pigment ink.  Unfortunately my ink pad was rather dry so I enhanced the colours and the depth of the swirls with more mica powder.  The black Utee background really makes the mica pop.  A note pad added on the inside finishes off my calendar and the challenge.

I have thoroughly enjoyed making my twelve easel cards and I thank the team at The Craft Barn for setting this.  Off to enjoy the final pieces of my colleagues on the challenge.

Monday, December 17, 2012

Knitting Basket Overhaul


Bought myself an antique knitting basket from Craigslist to tame my growing collection of leftover wool. It has beautiful turned dowels at the top but the cover was in a terrible state, so out with the old and in with the new.  I had bought a remnant of heavy brocade for $1 at a yard sale just last weekend and it is perfect.  I chose to have the tapestry side on the outside and the embroidered silk on the inside.  I know my sewing isn't perfect but I am very happy with the end result.  Total cost $21.  If anyone needs the instructions for revamping their basket cover or indeed for making a complete knitting basket they can be found HERE


Sunday, December 16, 2012

2012 Calendar Challenge - Circles


I think that you can see where my circles are on this calendar page.  The background is some spiral patterned paper and I used my bare tree stamp again.  Punched circles of red and two different greens are stuck over the branches and on the ground at the foot of the tree.  I added an embossed red border and the phrase "Seasons of Mists" but it looked unfinished.  So  I stamped the tree again on a piece of paper and cut around the trunk to use as a mask while I pounced yellow orange and red distress inks to represent the sun.

The challenge can be found over at The Craft Barn HERE

Thank you all for your kind comments over the past weeks, it really is encouraging.  Off to complete the challenge with the last calendar.


Friday, December 7, 2012

Heart Journal - Cover


For the twelfth month of the Heart Journal challenge we had to make a cover heart for the booklet incorporating all or as many of the techniques we have used over the past eleven months.  I have used all the techniques on my cover and added the word heart made out of wire (doesn't show very well in the photo) and a strip of transparency on the left side of each heart that I have punched with three holes and joined them all together with binder rings.  I added part of a charm bracelet between the rings to decorate it more.  On the reverse of each heart I have made a sticker that explains the technique used on that particular heart.  I am so pleased with the journal it has made and I thank Lillibule and Thealie for all their hard work this year setting this monthly challenge and I look forward to next year's challenge if they are doing another.  
A link to this challenge can be found HERE


Tuesday, December 4, 2012

2012 Calendar Challenge - Trees


Yet another easel calendar for The Craft Barn Challenge HERE  I used masks and brayered distress inks to make the background, a circle for the sun and torn paper for the ground.  A winter tree stamp and a few birds in flight (though you can't see them in the photo) complete the picture.

Monday, December 3, 2012

2012 Calendar Challenge - Teal, Rust and White


Late again for last week's challenge over at The Craft Barn HERE.  The challenge is a calendar using the colours Teal, Rust and White.  I made my easel card this week and pounced a blue sky (leaving white patches for the clouds) and an orange yellow sun with distress inks, stamped over the sun and embossed it with clear powder to make it shine.  The bird houses are stamped in brown ink and clear embossed and painted with watercolours of teal, rust, orange and maroon, the ground beneath is also painted to distinguish it from the sky.  The edges of the easel card are clear embossed over the various coloured inks.

A note pad stamped with a bird and the word "notes" finish off my calendar.

Thursday, November 29, 2012

2012 Calendar Challenge - Children or Cute


Great opportunity for me to use my cute little Maxwell stamp. Leaf and flower print papers torn and edged with green chalk ink, timber brown Stazon ink for Maxwell and his feet, contrasting paper torn and stamped with sentiment.

Challenge can be found HERE

Just had to show you my Apple Pie


Never had much luck making apple pie before, pastry always turned out soggy.  This is my Thanksgiving effort, and it was as delicious as it looks.  Thanks to King Arthur Flour for the pastry recipe and to Ina Garten for the contents.

Friday, November 16, 2012

2012 Calendar Challenge - Candles


Any form of candles are the challenge for this week's calendar over at The Craft Barn HERE.   I decided to use candle wax for an impression using a rubber stamp.  I had a lot of trouble with keeping the wax from sticking to the stamp and not the background but a little Versamark and patience in waiting for it to cool properly gave me impressions on the cage, background and bird.  I highlighted the raised areas with rub-ons.  My background is a single-ply paper napkin torn to pieces and glued to the cardstock.  I used a die cut bird in a gilded cage embellished with eyelets and beads and a charm, I thought it would be a temptation to the kittens on the calendar. 


Monday, November 12, 2012

Celestial - Black Gesso


The challenge this month over HERE at The Heart Journal is to use black gesso over a collaged heart and the challenge at Tag Tuesday HERE is "Celestial".  Due to time issues I am entering my heart in both challenges.  First the base is painted with black gesso and then attached the items.  I used some clay stars that I had previously made so were hard and when I ran them  through an embossing folder in the Cuttlebug sadly the imprint did not work very well.  Next time I will emboss them before firing.  Black lace, some wool threads, a chipboard plate with the word "Celestial" behind on copper paper and part of an old brass earring make up the rest of the pattern. The chipboard plate I covered with Distress Stickles to give it some texture.  After masking the word, I gave the whole heart another coat with black gesso then  took some blue, interference blue and aqua Lumiere paints and mixed them with water and sprayed over the whole thing.  When dry I highlighted the raised items with Rub-ons.

Thank you everyone for your wonderful comments last month, I have enjoyed very much looking at everyone's work here on this challenge, you are a very talented group of artists.

Tuesday, November 6, 2012

2012 Calendar Challenge - Felt


This week's challenge over at The Craft Barn is "Felt".  I didn't have any pieces of felt material so I decided to make my own felt.  I used wool roving to needle felt in the center of some flower petals to attach them to a small piece of cream silk material.  I used several other colours of wool roving and tiny shreds of the silk material to make the background.  The colours of this are much richer than I can get in my photograph.


The top sheet of the notepad is decorated with a stamped flower and the word "notes" I formed from pink wire and attached with tiny brads.

Thank you for all the wonderful comments last week and for visiting my blog.  I look forward to seeing everyone's work.

Link to challenge HERE

Friday, November 2, 2012

2012 Calendar Challenge #5 - Paper Tape


The challenge over at The Craft Barn this week is to use paper tape, either bought or homemade.  For my easel calendar this week I chose to make some lace paper tape using my edge punches.  One has flowers and the other linked arches.  I cut strips of paper about 1/4" wider than the punches and then punched along both sides.  In the end I cut down the middle and used tape with only one side punched.  I sprayed dark copper paint over a stencil to create a pattern on the base card and the top sheet of the notepad.  The base of the upright panel is corrugated cardboard with one layer removed to expose the ribs and then painted with gesso and a light spray of copper paint over the same stencil.   Lace and pearls decorate the edges.

Thank you once again for all your wonderful comments about my calendar last week.  

The challenge can be found HERE

Saturday, October 27, 2012

The Craft Barn Calendar Challenge - Doodles


Never been much of a doodler, but I have been waiting for a chance to try out some Zentangle, so this was a perfect opportunity to have a go.  I chose to "tangle" in the center a knot inspired by the Book of Kells, mainly because this calendar is for two of my best friends who are of Celtic descent.  I then embellished the outer edge with flowers as their beautiful garden is a passion for them.  Mounted on cardstock in black and white with a calendar of kittens, cats being another love of theirs, will make a great gift for them.  You can see the patterns in this closeup of the easel card closed.


Thank you for all your wonderful comments over the past few weeks, I have been tardy in replying due to health issues, hopefully now I am back in the swing of things.  

Thursday, October 25, 2012

Altered Book - Lesson 18 Transfers and Pop-ups


The lesson this time was student's choice, transfers and pop-ups.  I will leave the transfer to later but this is my pop-up page and I have to admit I had way too much fun with these lips.  They open and close with the book pages.  The tutorial for the origami lips I found on YouTube HERE, thanks to  kazuko0326.  The background is sprayed gold and copper paint using a mask that is a computer keyboard protector.  Music paper sprayed with Indian Red glimmer mist and gold paint is torn and stuck along the bottom, cardinal Christmas ribbon along the top and plastic leaves and pearl beads tied with ribbon for the mistletoe decorate the page.  

Now for the transfer...............sigh!!!!!
I have never achieved a good transfer yet.  This one used gel medium.  Followed the instructions and the picture transferred but then disappeared when dry.  I will try another method over the coming weeks to see if I can get something reasonable.  Elizabeth gave us plenty of methods so I am sure I will get one eventually. 


Friday, October 19, 2012

Vegetable Garden Update - October


Probably not of much interest to most folks but I am trying to keep a record of how my garden grew for future years.  This should help with making adjustments for timing, germination rates, varieties and quantity harvested.  The two plots 5' x 5' pots of corn are doing well now.  Bilicious  germinated better than the white to start off with but now the white is catching up.  Tomatoes are beginning to do well.  The beefsteaks look good, the cherry yellow pear were slow to germinate but now doing well.   Very slow germinating is Brandywine.  Herbs beginning to show,thyme is being very difficult.  Peppers have stayed about the same size now for over a month.  Not sure why but I remain hopeful.  Starting to harvest the Cherrybelle radishes, nice peppery hot taste.  Bought some onion sets yesterday and planted them along the front of the flowered edge.  Black beauty eggplant and brocolli rabe are now beginning to grow rapidly, kohl rabi is slower.  


Not sure that I will grow the English scarlet runner beans again as they seem to be struggling,  I will wait to make a final call on that when I see the size of the crop.  Probably the heat down here.  Sowed some peas in between the beans. The cucumbers and squash have lots of flowers now and are beginning to climb up the trellis.  No flowers on the zucchini yet but growing vigorously.  Carrot and onion seeds have germinated fairly well, a bit difficult to tell what is onion and what is grass growing.  Daily weeding between the rows is necessary at the moment.   Pest control so far has been spraying with soapy water to get rid of aphids on the beans.  Yesterday I found grubs in the tomato raised bed so going to have to do something about them.  Sevin dust may work, may put collars around the base of the tomato plants.

Wednesday, October 17, 2012

2012 Calendar Challenge - White, Yellow, Green


The challenge over at The Craft Barn this week is self explanatory.  My daughter is law is a huge fan of the Greenbay Packers so this challenge was perfect for me to make her a calendar for Christmas.  Using the same easel base as before I mounted a photograph of her favourite player Aaron Rodgers and Packers badge on yellow, green and white cardstocks.  The note pad at the bottom has a graphic of a football player with a Greenbay colours football.  Stamped the word "notes" in green ink.  

The challenge can be found HERE

Monday, October 15, 2012

Heart Journal October - Wax Finish


This month's altered heart uses candle wax as a finish.  I used dark red cardstock for the background of my heart and stamped and heat embossed it with a white powder skull.  I then dribbled black gesso down the whole heart in places and let this dry.  You can't see it but I then stamped the right side with black ink branches of a tree.  Using my heat gun I melted a white domestic candle to drip over the whole heart except around the skull.  I stamped with white ink a spider's web in the top right section.  The words "happy haunting" and a few vine leaves around the skull were also stamped and then highlighted with fimo gold powder.  I then used the same powder to highlight the texture of the wax at the bottom of the heart.   Finally i gave the whole heart a spray with semi gloss varnish.

Wednesday, October 10, 2012

Wizard's Wands


Came across the way to make these on Pinterest.  Quite a few people have given details and I followed Kate's instructions which can be found on her blog HERE

Basically they are made from chopsticks rolled in construction paper and covered with hot glue a marble stuck in the end and painted.with metallic acrylic paint.  These two wands are for my twin grandsons for Halloween, I hope to make them a wizard's cape and hat each to go with it.

Thank you Kate for the tutorial.

Monday, October 8, 2012

The Craft Barn 2012 Calendar Challenge - Week #2


This weeks challenge over at The Craft Barn is to use any type of ink, paint, spray or not, colouring pencils or even papers on your calendars, as long as it's bright.  Continuing with my easel calendars I have one that has a beautiful bulrush and sunset scene and I wanted to reflect the water theme.  My watercolour painting has a dark watery background to highlight the brightness of the dragonflies and reeds and the intensity of the white of the bird.  I used water photo real paper for the background mount of the note pad with the word "notes" and dragonflies stamped in pthalo green.  Each of the calendar pages has a psalm at the bottom for the month.

This week's challenge can be found HERE

Saturday, October 6, 2012

Altered Book Lesson 16 - Fabric


This lesson's homework, which I am a bit late in submitting, was to create a spread using fabric in some way.  I chose to cover two pages completely with fabric, as an aside this helped with the strength of my book which is beginning to burst at the seams.  I stamped a border of berries and holly about and inch inside the outside edge.  Another border of snowflake sequined ribbon was put on the outside edge of the stamping.  I cut snowflakes out of iridescent material and added smaller glitter snowflakes to the centers of each flake.  I coloured the berries and holly leaves with felt pens and added glossy accents to the berries to make them stand out.  

  
Finally I stamped the words "Let It Snow" in the top corner in white ink and added glossy accents to make it stand out better.  Once again I struggled with taking photos of shining material.  Perhaps a lesson on this would help me some.

Off to look around the other altered books of my colleagues and to catch up with our student's choice lesson.  Thank you Elizabeth for a wonderful tutorial as usual detailing dying fabric and the various methods to collage the pieces onto our books.  Love the fabric beads you made, will have to try these when I have more time.

Thursday, October 4, 2012

Christmas Angel Decoration


I came across a paper angel tutorial on Pinterest and followed the link to Carol's blog.  There she gives full instructions, including video for this paper angel.  She also gives details of a couple of other variations which I will try out later to put on our tree later on in the year. 


 Carol's work and her blog is very interesting and the angel can be found HERE  I prefer her baubles with the dainty wire top but this was all I could find at the moment, perhaps after Thanksgiving I will have a better selection.


Wednesday, October 3, 2012

2012 Calendar Challenge #1

The 2012 Calendar challenge over at The Craft Barn has begun, I have not been able to do this in previous years, but now I am setting my mind to follow along.  The challenge this week is to add some vellum.  At last I am forced into trying out my Pergamano set that I bought while visiting my daughter in the UK.  I have decided to make 12 easel calendars for friends and family, so I bought some pretty calendar tabs from Michaels in their sale to mount on the cards.


Firstly, I embossed and pricked the vellum into a pretty flower pattern and mounted it onto various mats edged with silver .  I cut two pieces of cardstock 6" x 12" and folded themt at 6"  and at 9".  This forms the easel part of the card, I reinforced it by sticking the pieces of cardstock together to cope with the weight of the calendar tab. I added a note pad edged with silver and stamped on the top sheet with a clematis vine stamp and the word "notes" The card when made lies flat and is about 1/4" thick and when it is unfolded it looks like this.


If you would like to join in the challenge hop over to The Craft Barn blog HERE

Monday, September 24, 2012

Vintage Transport


Such a pretty picture of an old fashioned bridal car it just called out for a Wedding card.  Edged in silver mounted on frayed mulberry paper and mounted on a silver edged, black mat.  Congratulations stamped in white and edged in lace with sequins.

I am entering this into Make my Monday challenge this week at http://mimchallegeblog.blogspot.com/
and Love to Create Challenge at
http://lovetocreatechallenge.blogspot.co.uk/

Sunday, September 23, 2012

Mouse House


Once again I am so proud of my daughter's work.   Last year she hand made a model of a hobbit house and this year it is a mouse tree house, fashioned after the spring house in the Brambly Hedge book.  I love the detail she has put into it, her work with clay is astounding.  Also who could resist that adorable little mouse.  Her blog can be found at http://madsmousehouse.wordpress.com/

Do leave a comment for her as encouragement is always welcome.

Wednesday, September 19, 2012

Make my Monday - Vintage Children


The theme this month is Vintage and for this week the topic is Vintage Children.  My printed image of the little boy at the seaside is mounted onto two mats of distressed paper and the edges of the bottom mount are curled at the top.  I stamped a star fish and a shell along the bottom edge and added a fishing net with distress stickled star, fish and shell shapes.  A ribbon of clay coloured blue across the bottom to represent water finishes the card.

A link to the challenge can be found here http://mimchallegeblog.blogspot.com/

Sunday, September 16, 2012

Show us your Twinchies - Stamped Image


Went to a thrift store today and picked up some Design 2 Art Markers that are alcohol ink pens with broad an fine tips at each end.  I paid very little for these pens and am thrilled with my find.  For this challenge I stamped a sunflower image with versamark on cardstock and coloured it in with my new pens.  Tried the same thing on glossy photo paper but the versamark ink image blended into the alcohol inks.  I will have to try that one again with stazon.


For my second stamped image I chose a clematis stamp and painted the background, flowers and leaves with Twinkling H2Os.  I do love the effect these paints give .

Thank you all for your lovely comments on my last pieces and I look forward to seeing all your entries.  Link to the challenge is here  http://twinchie-twinchiehotmaillive.blogspot.ca/ .  
Thanks for dropping by.


Monday, September 10, 2012

Heart Journal September - Puffy Heart


For this month we had to create a heart using cotton wool balls sandwiched between two heart shapes, with a border of material.  A while ago I bought a wonderful peacock stamp that I wanted to use, this of course decided on my choice of colours.  For the front heart shape I sprayed some sheet music with Glimmer Mists in blue and olive green and for my border I added some loosely woven ribbon that I sprayed with the same blue.

The cardstock base was coated with gesso and the ribbon and cotton wool was added while still wet.  This was left to dry completely overnight.  I stamped the peacock with blue Versamark and heat embossed it with clear holographic powder that shimmers and picks up all the blues and greens surrounding it.  I cut some heart shapes out of the same sprayed paper, fanned them out into a representation of a peacock's tail and added them with a blue brad.  I stitched the top layer onto the bottom with blue and green thread.  "Peacock Tail" is written in blue felt pen.  This heart has a shimmer that cannot unfortunately be seen in this photo.

Off to look at the wonderful contributions by the other ladies in this challenge.  Thank you for looking at my blog and for your wonderful comments last month.

Friday, September 7, 2012

Make My Monday


Been such a long time since I entered a piece on the challenge over at Make my Monday.  The theme this month is "Vintage" and the challenge this week is "Fashion".  The image I have used is cut from a Graphic 45 sheet. The ladies in their beautiful underwear look to me like they are from the 1920's and I am sure that the price of $1.95 for an "Ever Dainty" petticoat was quite a sum to pay back then.  I made a frame from white Brodraise Anglaise for the background then distressed and aged it with antique linen distress ink.  The mat for the photograph and sentiment is made from wax paper crinkled and then distressed with aged photograph ink. After I mounted the picture and sentiment I gave them both a coat of gel medium to give them a glossy appearance. I coloured some yellow string pearls and lace flowers with the same ink to colour co-ordinate all the objects.  This challenge can be found at http://mimchallegeblog.blogspot.com/

Apologies for my long absence but hopefully I am back into the swing of things.  Off to look at some of the wonderful work that is being put up here.

Wednesday, September 5, 2012

Altered Book Lesson 17 - Polymer Clay


I have not really made much from clay in the past, my daughter is the expert on this, her blog is at http://madshobbithole.wordpress.com/ scroll down to see her food items made from clay.  

For this lesson Elizabeth showed up how to prepare, roll, cut and bake polymer clay to make embellishments for pages, cards, scrapbooks etc.  She explained the importance of dedicating all your equipment used with this medium for clay making only.  On my page I have used ultra light Fimo, which is white, and painted my stamps with pearl-ex prior to stamping onto the rolled out clay.  The "Visit From Santa" coloured well but the holly leaves and berries were a little pale so I used some felt pens to intensify the colour.    My pages in my book were coming away from the outer cover so I first of all put a strip of Christmas ribbon along the seam to reinforce it.  Magazine pages cut up for the hearth and stockings, flames, coals and Santa.  Embossed metal tape coloured with alcohol inks for the presents at the bottom, and a distressed edge torn piece from a magazine with the words finish the page.

I will certainly be trying some more embellishments with this light weight clay, I will have to make some clay in moulds, I have some hidden away somewhere if I could only remember where.  Beads for an edge would be fun to make also.  Thank you Elizabeth for your tutorial.

Tuesday, September 4, 2012

Show us Your Twinchies - Autumn


My last set of twinchies has been removed as they are more suitable for Halloween, a challenge to come later, so I am replacing them with these.  Anyone else have problems photographing shiny things?  No matter how I tried the colours are not true.  The background is copper paper with leaves dry embossed onto them.  The tiny leaves are die cut from the lids of yogurt pots and embossed in the same folders as the background and then inked with red green and copper alcohol inks.  I mounted them onto black cardstock, then onto autumn leaf patterned paper and then onto a card.  I edged the mounts and the card with copper ink.

Thank you for all your comments on my entries into the last challenge, encouragement is always  appreciated.  The challenge can be found at http://twinchie-twinchiehotmaillive.blogspot.ca/ of course as usual the more the merrier.


Monday, September 3, 2012

Spirited Peaches


The peaches and nectarines are just so sweet and juicy and cheap at the moment I decided to preserve a few.  I have a wonderful preserving book called Ball Complete Book of Home Preserving that apparently contains 400 delicious and creative recipes for today.  Well I have only tried about twelve so far but all seem to be great.  The simple recipe involved peeled, sliced, and treated to prevent browning peaches boiled in sugar water for 5 minutes then hot packed in sterilized canning jars with a tablespoon of your favorite liquor,brandy in this case.  the jars are then completely submersed in rapidly boiling water for 20 minutes.  Turn off the heat  and after 5 minutes resting in the water remove the jars.  I guess the worst part of this process is the peeling of the peaches, dip into boiling water for 60 seconds then shock in ice water, the skins come off easily but when you have a lot of peaches to skin it becomes boring.  We have a very large saucepan that we used for frying chicken and a high heat burner with gas tank so I can do all the hot work outside, also it is much faster at cooking than our gas range in the house.   I have 10 jars in total to add to my store.  
Can't wait to try them over some vanilla ice cream.


Sunday, September 2, 2012

Show us Your Twinchies Challenge - Awaiting Halloween


The theme this time is Autu\mn.  This reminded me of the frosty mornings in England, oh how I miss them, cold and crisp.  I decided to make a tiny spider on his web frosted with holographic glitter, hence the bad quality of the photo.


My next one was to represent Halloween.  Clay witch on broomstick, background star paper, blue glitter paper and silver glittered border.


Finally a pumpkin patch on a frosty night.  This American tradition is lovely and so much fun for the kids.  

Thank you everyone for your wonderful comments to my last entries, I feel very proud to display my badge in my side bar.


Wednesday, August 29, 2012

Cascade Card


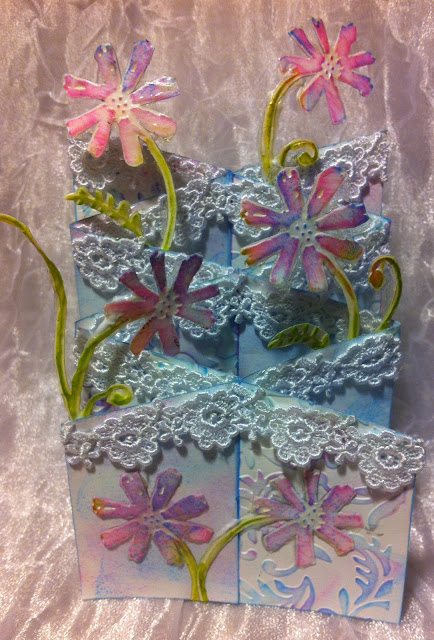
I came across a wonderful tutorial for a cascade card (thank you Jacqueline) which I just had to have a go at.  Once I had studied the measurements and cuts properly it fitted together perfectly.  I decorated the card firstly by embossing one piece with a Cuttlebug folder and highlighted the raised pattern with pink aqua and blue cat's eye inks and the second piece I left flat but inked with the same colours.  I felt that the flat surface next to the embossed one gave it more detail, if that makes sense.  Some pieces of lace along the top edges to give it strength and some Cuttlebug embossed flowers cut out and inked and coated with decoupage medium to give them a bit of strength were slotted into the pockets of the constructed card.  You can find the construction details on Jacqueline's blog here

Monday, August 27, 2012

Flooding around the house


Woke up this morning after a very stormy night to find the road completely flooded.  No matter, wasn't going anywhere today, good day for crafting.  Eight hours later the front garden looks like this..............


Can't even walk to the road now the pond in the front has now become the complete front garden, I have tadpoles swimming down my drive LOL.


The back garden is not much better, the poor shed that is raised two feet off the ground is now just about to float away.  My newly planted vegetable garden is a complete wash out.


The storms have continued to run up the east coast of Florida all day and now we seem to be getting a bit of a respite from the worst rain, just light now.  The county says that they have all the canal pumps running at full tilt pumping water away but so far the waters are not going down any.  Hope tonight is not another stormy nail biting ride.